Identity Providers
This page explains the configuration parameters in: Settings > ZTNA > Configurations > Identity Providers of admin portal (portal.safous.com)
Page Overview
This page provides settings for the administrator to manage authentication for the user portal. By default, a local IdP is enabled that keeps all users' databases locally, but you can also add another IdP to allow users to authenticate using a third-party IdP, such as an LDAP server, MS-AD, SAML-based authenticator, etc.
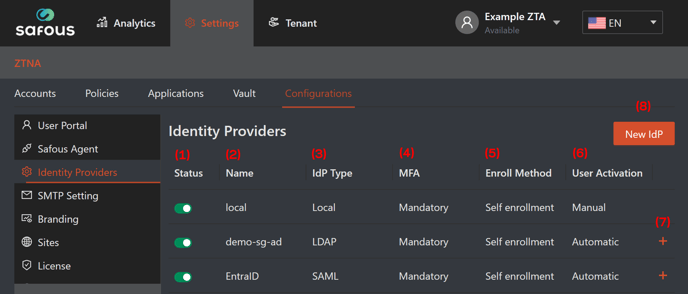
1. Status, in this column you can toggle switch each registered IdP (Identity Provider), whether you want to enable or disable it.
2. Name, this column shows the name of the registered IdP defined by the administrator.
3. IdP Type, this column shows the protocol used by the registered IdP whether local (system default), LDAP, OpenID, or SAML.
4. MFA, this column shows the multi-factor authentication setting for the registered IdP whether mandatory (use system MFA), no MFA (not using MFA), or External MFA (utilize MFA from the registered third-party IdP).
5. Enroll Method, this column shows the enrollment method on the Safous side after a new user registered in the third-party IdP whether Admin rollout (the user needs to be registered manually in Safous not sync automatically with the third-party IdP) or Self enrollment (user can register to Safous right after they registered in the third-party IdP).
6. User Activation, this column shows the user activation method after they have done the enrollment (for Self enrollment) whether Automatic (active right after enrollment) or manual (needs to be activated by the administrator after enrollment).
7. Plus (+) button, this button can be clicked to show the detailed configuration of registered third-party IdP. More details about the configuration's parameters are explained in point 8.
8. New IdP, this button allows you to register a third-party IdP to authenticate users to the user portal. When you click this button, a form will appear for you to fill out.
IdP Configuration
LDAP
-
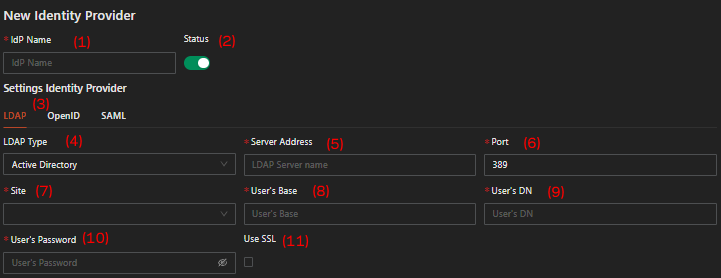
IdP Name, fill this parameter with a suitable name to describe the third-party IdP.
-
Status, toggle this switch to disable/enable the third-party IdP.
-
Protocol Make sure you choose LDAP in this option.
-
LDAP Type, choose the type of LDAP whether Active Directory for Microsoft or Open LDAP for open source version.
-
Server Address, fill in the LDAP server address.
-
Port, define the LDAP port (default is 389).
-
Site, choose which site/AppGW has a connection to the LDAP server (you can choose more than one or all of them).
-
User's Base, get the relevant information from the LDAP server and make sure the user has the required authority/permission.
-
User's DN, get the relevant information from the LDAP server.
-
User's Password, fill in the relevant information related to the user information mentioned in point #a.8.
-
Use SSL, check this option if you use LDAPS which will allow end users to reset their AD password through Safous. To enable this mode, Active Directory must support LDAPS. See the following article:
also, the port on point #6 should be set to 636 (default LDAPS port).

-
Username, fill in this parameter with the username attribute from the LDAP server. Usually, the attribute is as shown in the picture.
-
Email, fill in this parameter with the email attribute from the LDAP server. Usually, the attribute is as shown in the picture.
-
First Name, fill in this parameter with the first name attribute from the LDAP server.
-
Last Name, fill in this parameter with the last name attribute from the LDAP server.
-
Phone Number, fill in this parameter with the phone number attribute from the LDAP server.
-
Personal Desktop, fill in this parameter with the personal desktop attribute from the LDAP server.
-
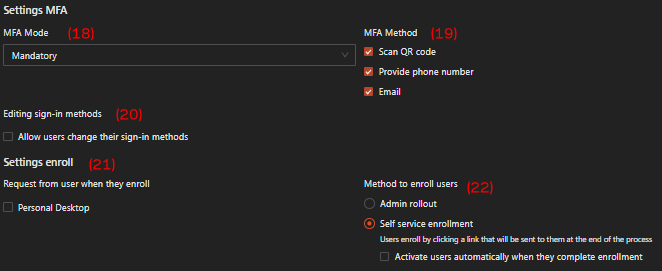
MFA Mode, choose which option you want for the MFA setting whether Mandatory (enforce MFA enrollment by Safous system), No MFA, or External MFA (use the third-party IdP MFA).
- In Mandatory MFA mode, the settings for MFA utilize Safous' built-in methods (see #19).
- If you choose No MFA mode, the users who used the IdP will not be asked to enter MFA when they login to the user portal. Note that doing so will need you to disable "Require MFA" in conditions for these users to be able to access apps.
- If you choose External MFA, Safous will delegate the users' MFA verification to the IdP. The available MFA methods defer to the MFA settings configured in that IdP.
-
MFA Method, check which MFA option (for Mandatory MFA mode) you want for the IdP whether QR-based, phone number, or Email.
- Scan QR code, Provides a QR code to be scanned by user.
- Provide phone number, sending SMS OTP to the user's phone number.
- Email, sending OTP to the user's email.
-
Editing sign-in methods - Allow users change their sign-in methods, If this option is enabled, users will have the ability to change their selected MFA methods. This gives them flexibility to switch between different methods as needed.
-
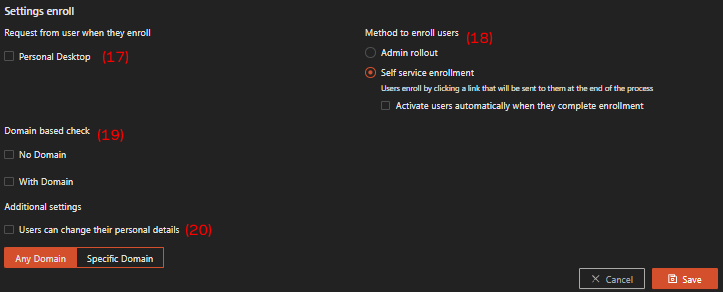
Request from user when they enroll—Personal Desktop, when this option is checked, the user will be asked for their personal desktop information during the first enrollment.
-
Method to enroll users, choose which enrollment method you want for the IdP user between:
- Admin rollout: user needs to be registered manually by the administrator in the system; or
- Self-service enrollment, user automatically registered in the system when they registered in the third-party IdP.

-
Domain based check, the purpose is to redirect new users, on their first login attempt, to the relevant IdP by looking at the domain from the username:
-
When “No domain” is checked, this means that users who do not provide a full domain name can enroll via this IdP.
-
When “With Domain” is checked, two tabs are available, one for “Any domain,” and another for “Selected domain.”
- “Any domain” is defaulted on which means that the user will be able to enroll with this IDP regardless of their user domain.
- To make the enrollment process more restricted, select “With Domain,” and enter “Specific Domains”.
-
-
Users can change their personal details, Allows users to update their personal information after enrollment.
OpenID

-
IdP Name, fill this parameter with a suitable name to describe the third-party IdP.
-
Status, toggle this switch to disable/enable the third-party IdP.
-
Protocol Make sure you choose OpenID in this option and several checkboxes will appear. The checkboxes defined what kind of data will be requested from the client by the browser:
-
openid: request for OIDC authentication and an ID token.
-
email: request for access to the end user’s email.
-
profile: request for access to the end user’s profile.
-
-
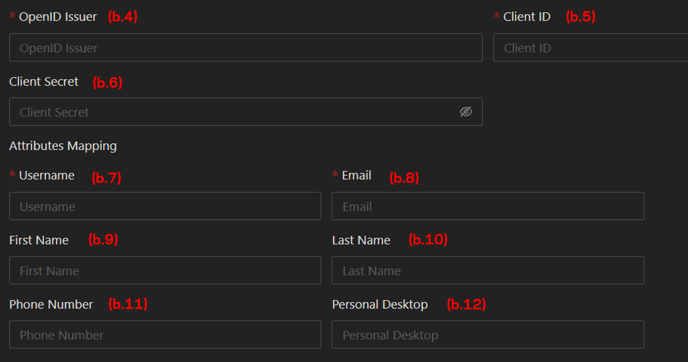
OpenID Issuer, the issuer URL provided by the third-party IdP.
-
ClientID, a public identifier provided by the third-party IdP.
-
Client Secret, used by the client to exchange an authorization code for a token provided by the third-party IdP.
-
Username (mandatory), fill in this parameter with the suitable OpenID claim from the third-party IdP.
-
Email (mandatory), fill in this parameter with the suitable OpenID claim from the third-party IdP.
-
First name (optional), fill in this parameter with the suitable OpenID claim from the third-party IdP.
-
Last Name (optional), fill in this parameter with the suitable OpenID claim from the third-party IdP.
-
Phone Number (optional), fill in this parameter with the suitable OpenID claim from the third-party IdP.
-
Personal Desktop (optional), fill in this parameter with the suitable OpenID claim from the third-party IdP.

-
MFA Mode, choose which option you want for the MFA setting whether Mandatory (enforce MFA enrollment by Safous system), No MFA, or External MFA (use the third-party IdP MFA).
- In Mandatory MFA mode, the settings for MFA utilize Safous' built-in methods (see #19).
- If you choose No MFA mode, the users who used the IdP will not be asked to enter MFA when they login to the user portal. Note that doing so will need you to disable "Require MFA" in conditions for these users to be able to access apps.
- If you choose External MFA, Safous will delegate the users' MFA verification to the IdP. The available MFA methods defer to the MFA settings configured in that IdP.
-
MFA Method, check which MFA option (for Mandatory MFA mode) you want for the IdP whether QR-based, phone number, or Email.
- Scan QR code, Provides a QR code to be scanned by user.
- Provide phone number, sending SMS OTP to the user's phone number.
- Email, sending OTP to the user's email.
-
Editing sign-in methods - Allow users change their sign-in methods, If this option is enabled, users will have the ability to change their selected MFA methods. This gives them flexibility to switch between different methods as needed.
-
Auto provisioning, an identity management process that ensures user accounts are created, granted proper permissions, modified, disabled, and deleted as needed through SCIM.
-
Request from user when they enroll—Personal Desktop, when this option is checked, the user will be asked for their personal desktop information during the first enrollment.
-
Method to enroll users, choose which enrollment method you want for the IdP user between:
- Admin rollout: user needs to be registered manually by the administrator in the system; or
- Self-service enrollment, user automatically registered in the system when they registered in the third-party IdP.
-
Domain based check, the purpose is to redirect new users, on their first login attempt, to the relevant IdP by looking at the domain from the username:
- When “No domain” is checked, this means that users who do not provide a full domain name can enroll via this IdP.
- When “With Domain” is checked, two tabs are available, one for “Any domain,” and another for “Selected domain.”
- “Any domain” is defaulted on which means that the user will be able to enroll with this IDP regardless of their user domain.
- To make the enrollment process more restricted, select “With Domain,” and enter “Specific Domains”.
-
Users can change their personal details, Allows users to update their personal information after enrollment.
SAML

-
IdP Name, fill this parameter with a suitable name to describe the third-party IdP.
-
Status, toggle this switch to disable/enable the third-party IdP.
-
Protocol, make sure you choose SAML to determine that SAML will be used to integrate with a third-party IdP.
-
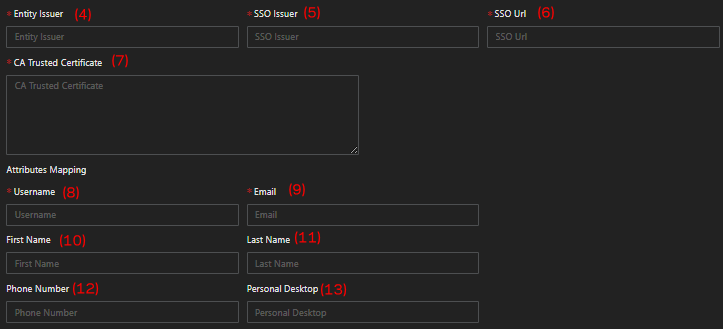
Entity Issuer, parameter provided by the third-party IdP usually the identity/name of the application.
-
SSO Issuer, a URL that uniquely identifies the SAML of third-party IdP.
-
SSO URL, the SSO URL provided by the third-party IdP.
-
CA Trsusted Certificate, X.509 Certificate from the third-party IdP.
-
Username (mandatory), fill in this parameter with the suitable OpenID claim from the third-party IdP.
-
Email (mandatory), fill in this parameter with the suitable OpenID claim from the third-party IdP.
-
First name (optional), fill in this parameter with the suitable OpenID claim from the third-party IdP.
-
Last Name (optional), fill in this parameter with the suitable OpenID claim from the third-party IdP.
-
Phone Number (optional), fill in this parameter with the suitable OpenID claim from the third-party IdP.
-
Personal Desktop (optional), fill in this parameter with the suitable OpenID claim from the third-party IdP.

-
MFA Mode, choose which option you want for the MFA setting whether Mandatory (enforce MFA enrollment by Safous system), No MFA, or External MFA (use the third-party IdP MFA).
- In Mandatory MFA mode, the settings for MFA utilize Safous' built-in methods (see #19).
- If you choose No MFA mode, the users who used the IdP will not be asked to enter MFA when they login to the user portal. Note that doing so will need you to disable "Require MFA" in conditions for these users to be able to access apps.
- If you choose External MFA, Safous will delegate the users' MFA verification to the IdP. The available MFA methods defer to the MFA settings configured in that IdP.
-
MFA Method, check which MFA option (for Mandatory MFA mode) you want for the IdP whether QR-based, phone number, or Email.
- Scan QR code, Provides a QR code to be scanned by user.
- Provide phone number, sending SMS OTP to the user's phone number.
- Email, sending OTP to the user's email.
-
Editing sign-in methods - Allow users change their sign-in methods, If this option is enabled, users will have the ability to change their selected MFA methods. This gives them flexibility to switch between different methods as needed.
-
Auto provisioning, an identity management process that ensures user accounts are created, granted proper permissions, modified, disabled, and deleted as needed through SCIM.
-
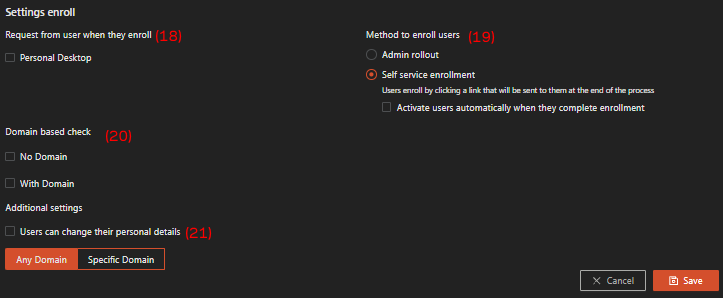
Request from user when they enroll—Personal Desktop, when this option is checked, the user will be asked for their personal desktop information during the first enrollment.
-
Method to enroll users, choose which enrollment method you want for the IdP user between:
- Admin rollout: user needs to be registered manually by the administrator in the system; or
- Self-service enrollment, user automatically registered in the system when they registered in the third-party IdP.
-
Domain based check, the purpose is to redirect new users, on their first login attempt, to the relevant IdP by looking at the domain from the username:
- When “No domain” is checked, this means that users who do not provide a full domain name can enroll via this IdP.
- When “With Domain” is checked, two tabs are available, one for “Any domain,” and another for “Selected domain.”
- “Any domain” is defaulted on which means that the user will be able to enroll with this IDP regardless of their user domain.
- To make the enrollment process more restricted, select “With Domain,” and enter “Specific Domains”.
-
Users can change their personal details, Allows users to update their personal information after enrollment.
After you define all parameters, don't forget to click the Save button.